Not everyone works with models. A lot of photographers have the job
of shooting with everyday people and we need to make them look like
models. So how do you do that when the subjects have no experience
posing or controlling their face for the camera? Here are seven tips to
make your portrait subjects feel like models.
1. Pose the Hair
We don't generally think of hair as a part of the body we can
control, but you really can! If you are shooting a subject with long
hair, then bad hair is going to be the first thing anyone notices about
your photo. There are no rules as to what looks "best" across the board.
Everyone will look different with their hair a different way.
Let's assume you're doing a basic portrait session without makeup
artists and hair stylists. The first thing to remember is that hair
sitting on the shoulders looks terrible. If the hair sits on their
shoulders, then it looks wild and you need to do something with it.
There are five different things that they can do with their hair.
Hair all behind the shoulders.
Hair all in front of the shoulders
Hair all on one side.
Hair all on the other side.
Hair up.
Hair on the shoulders (#1) should be avoided at all costs. All of the
other hair positions have their place depending on your model and the
look you are trying to achieve. The reason I shot the hair on both sides
(#4 and #5) is because the natural part in a person's hair will lend to
one side looking better than the other.
Generally you want their part facing the camera so more of their face
is included. For this tutorial, I chose hair up (#6) so we can more
easily see the posing instructions without distraction. Many women see
ponytails as the "day-off" hair style, but it actually lends itself very
nicely in portraits and headshots since you have clean view of their
face.
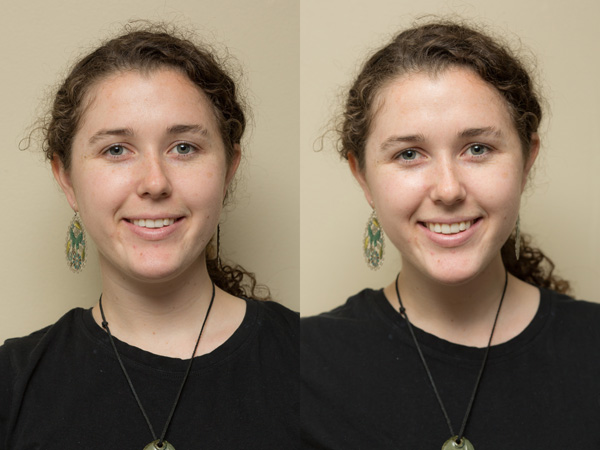
2. Pull the Chin (or Ears) Forward
When someone stands in their normal relaxed stand, or even stands up
straight to have nice posture, there is a little bit of flab right
underneath their chin. No matter how skinny they are, you will see this.
If you tell people to bring their chin forward, which sounds like the
sensible thing to do, they will point their chin at you, which brings
their face up and ends with you shooting up their nostrils. (Not
attractive.) Instead, tell your model to bring their ears forward.
This demonstrates the before and after of telling them to bring their ears forward.
Same before and after from the side. Sometimes I call this
"turtling," because they feel like a turtle coming out of their shell.
It is a bit uncomfortable or unnatural, but the results are always worth
it.
Same technique from a male subject. He was very fit and athletic, but our natural stance is not very photogenic.
3. Lift the Arm
When people stand naturally, another thing they do is stand with
their arms flat at their sides. This causes several problems. First, it
makes them look awkward and uncomfortable in the photo. Secondly, their
arm presses against their torso. This squishes the arm out and makes it
look larger than it actually is.
You can correct that by having them just lift their arm an inch or
two so it is "floating" and not pressed against them. Alternatively, you
can pose their hand so the arm is in a different position, such as
putting their hand on the hip. In the image above, the red line is the
size of the arm when standing unposed. The exact same red line was moved
over to the second photo so you can see how much smaller the arm
becomes when not pressed against the body.
4. Leave Visual Space by the Waist
Everyone loves looking thin. One of the things you can do to trim
down your subject is by giving them their "natural" waist, without any
additives. What I mean by that is visually isolating the skinny part of
the torso so they look as thin as they are. I had my model put her hands
on her hips. The first photo shows no further posing. The arm in the
back has no space between it and the torso, so it visually extends her
mid-section. By having her pull the arm a little forward, you can see
the space, so the waist doesn't have anything adding visual bulk.
The red line shows the visual width of the subject from the first
photo. It is replicated in the second photo to show how much width the
arm actually adds. This rule does not just apply to arms. Anything that
will be in the background of your subject and make them look larger can
be an offender. A few examples are other people, tree trunks, or light
poles.
5. Turn the Shoulders
This is a very simple tip, but important. If your subject stares at
the camera head-on, they look bigger. This can be good when shooting a
football player or CEO of a big company, but it is bad when shooting
beauty or portraits. By having your subject turn, they are showing a
slimmer profile of themselves to the camera, and look slimmer.
The red line shows the full width of the model when standing straight
forward. A small turn to the side gives a photo that is still the
subject facing the camera, but in a slimmer profile.
6. Don't Show the Whites of the Eyes
When you want a far off, dreamy look and choose to have your subject
look off camera, do not tell them to "look over there." Give them an
object behind you to focus on so you can control their eyeline.
The first photo, I told the model to look out the door next to us.
You can see the majority of the white of her eye, which is a bad thing.
You want to see the iris, the colored part. I had her look out the
window next to the door. That small change in eyeline brings back her
eyes, gets rid of the white part, and gives a more attractive portrait.
Advertisement
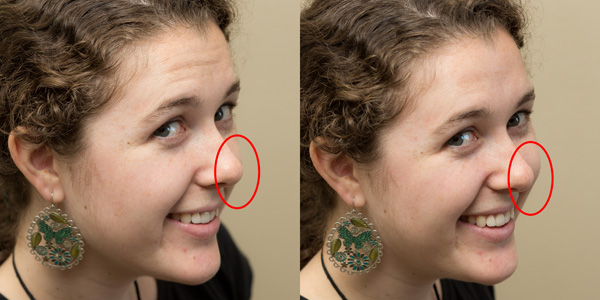
7. Don't Let the Nose Break the Face
This one is a bit more complex, but still important. When you don't
want your subject facing forward, you have them turn to the side.
Assuming you don't want a full profile where you only see one side of
the face, they will be at a quarter turn with both eyes in frame. If you
draw an imaginary line down the side of their face, this line is the
line that cannot be crossed by their nose.
If they turn too far and the nose crosses this line, it "breaks" the
natural curve of the face. It creates the "pinocchio" effect and extends
the length of their nose. You can avoid this by having them turn back
toward you slightly, until you can see a little bit of space between the
end of their nose, and the side of their face. You don't want to break
that line or it makes them look like they have disproportionate facial
features.
Bringing it All Together
Here's a checklist you can follow for your next shoot.
Hair is behind one shoulder, in front of the other
Chin is forward to create a strong jawline
Arm is lifted from the torso
Waist doesn't have any visual extenders
Shoulders are turned
Iris is seen over the whites
Nose doesn't break the line of the face
What have you done to make everyday people feel like models?
Via Phototut


Post a Comment